Saturday, November 20, 2010

Thanksgiving Dinner Rolls

The story begins on a farm. We called it 'the fat farm'. It was the place we went every Thanksgiving when I was growing up. The enticing aromas of roasting turkey, cooking potatoes, and yeast greeted you as soon as you walked in the door. Soon after, you were enveloped in a hug so tight you could barely breathe!


I would hang up my coat in the closet and follow the other ladies in my family to the kitchen. There, I would help form the Parker House rolls and get them into the oven. The rolls cooked while the turkey was resting and the gravy was being made. As soon as they came out of the oven, they were lovingly coated in salted butter. These were the best rolls on the planet and they were made by my Great Grandma Minnie.


Grandma Minnie passed away in 2007 at the age of 102. She cooked Thanksgiving dinner for her family for over 50 years in a row. Imagine that! I tried to learn how to make rolls from her, but she never measured anything. If you asked her for a recipe, she couldn't give you one. She could tell you what was in the food, but couldn't tell you how much.


"How much flour should I add, Grandma?"

"Enough so that it feels right."


Ha ha! I miss her so much. Well, today I ran across a recipe on the Martha Stewart website and decided to try it. I read through the recipe, gathered the ingredients, and put everything together. What came out of the oven tasted just like Great Grandma Minnie's rolls! Hooray! I will confess-- I messed up on the recipe but it turned out wonderful! So, here is my recipe for Thanksgiving Dinner Rolls, Great Grandma Minnie style (adapted from Martha Stewart).


Thanksgiving Dinner Rolls
Great Grandma Minnie Style
1/4 cup warm water (115 degrees F)
2 tsp rapid rise yeast (2 envelopes)
1-1/2 cups warm whole milk (115 degrees F)
1/2 cup (1 stick) unsalted butter, melted, plus more for the bowl and pans
1/4 cup sugar
2-1/4 tsp salt
3 large eggs
3 cups bread flour
3-1/2 cups all purpose flour
2 Tbsp salted butter, melted
1. Place warm water in a small bowl with a little bit of the sugar (1 tsp). Sprinkle the yeast over the water and let stand until foamy, about 5 minutes. In the bowl of a standing mixer or in a large bowl, whisk together the milk, butter, remaining sugar, salt and the eggs. Whisk in the yeast mixture.
2. With the mixer on low or with a large wooden spoon, mix in the 3 cups of bread flour. If using a mixer, give it a good whirl, then switch the whisk attachment to a dough hook. With the mixer on the lowest speed, add the remaining 3-1/2 cups all purpose flour a little at a time. The resulting dough should be a little shaggy. You can also do this my hand with a large wooden spoon, but the mixer is a lot easier! Once all the flour is incorporated, let the dough rest for about 10 minutes.
3. Mix on medium speed for 6 minutes. Turn it out onto a lightly floured counter and knead for another 2 minutes. If kneading by hand, knead it on a lightly floured counter for 5 to 10 minutes or until the dough is smooth and elastic. Form into a large ball.
4. Coat a large bowl with melted unsalted butter. Place the large ball of dough in the bowl and cover loosely with plastic wrap. Set in a warm place for 1 hour 15 minutes, or until doubled in size.
5. Butter two 13x9" pans. Sprinkle lightly with salt. Deflate the dough by gently pushing it down and turning it over in the bowl. Pinch off golf-ball-sized pieces and make into balls. Place the balls of dough in the pan, 3 across and 5 long so each pan holds 15 rolls. Cover loosely with plastic wrap and let rise in a warm place for 1 hour or until doubled in size.
6. Preheat oven to 375 degrees F. Put the oven racks in the bottom third and top third of the oven. When the rolls are done rising, remove the plastic wrap and place one pan on the bottom rack and one pan on the top rack. Cook for 10 minutes, rotate the pans top to bottom, back to front, and continue to cook for another 10 minutes or until evenly golden brown.
7. Remove from oven and place the pan on cooling racks. Lightly brush with salted butter and allow to cool. After 10 minutes, remove the rolls from the pans and allow to cool completely on the cooling rack. These rolls are HEAVENLY when devoured while still warm with fresh melted butter.
Love you and miss you, Great Grandma Minnie!

Wednesday, November 17, 2010

Butternut Squash Salad and Soup

Say Hello to Bella! She's one of my parents' new pups. My parents adopted Bella and her sister, Gracie, a couple weekends ago. I haven't EVER seen my Dad giggle so much. :) Ralfie and Tobie had the joy of spending a week at their house while I went on a business trip to Pittsburgh. Ralfie was the best cousin! He was really good with the girls.
Tobie was scared to death of them! He spent most of his time on the couch or ottoman where the girls couldn't get to him.

Here's Mr Ralfie making sure the girls are playing nice. Bella just loves cuddling up in that lion neck pillow that my mom found. Ralfie was a little nervous about the girls playing with his bear or his bone, but other than that he made a very good cousin!

And Mr. Ralfie again after his haircut yesterday. Tried to get a pic of Tobie but it didn't turn out. Darn!


And now on to dinner. I made this Butternut Squash Salad last night. There are a few suggestions I have for making it better. As is, it was ok. I learned something-- Butternut squash is MUCH easier to peel once its cooked!
I served it along side a grilled chicken breast with a bit of blue cheese crumbles.

Interesting flavor combo! Here's the recipe:
Cut a butternut squash in half lengthwise, scoop out all the seeds. Cut the 'Bowl' part off of the top part. Then cut into 1"x1" strips. Put these in a pot and add just enough chicken stock/broth to cover. Add 1/2 of a chopped onion. Bring to a boil, reduce heat and simmer for about 10 minutes. Remove the squash from the liquid (but save the liquid!) and let cool. Once cool enough to handle, peel and cut the squash into bite-size pieces. Save 2 cups for the salad and add the rest back to the broth. The squash should be just underdone.
For the dressing, whisk together 2 Tbsp cider vinegar, 1-1/2 Tbsp apple juice or apple butter, 1 Tbsp canola oil, 1/2 tsp dried parsley or 1 Tbsp fresh chopped parsley and 1/4c chopped red onion. Season to taste with salt and pepper. Let stand for about 10 minutes. I used dried parsley but I think fresh chopped parsley would have been much better.
Add the cooked squash pieces and toss. Serve with grilled chicken and blue cheese. Blue cheese would make a GREAT addition to this salad, along with dried cranberries and toasted sliced pecans. Yum!
As for the rest of that squash in the pot, make soup! Let it simmer another 5-7 minutes, then remove from the heat and zip with an immersion blender until smooth. Season to taste with salt and pepper, and whatever spices you have around. Curry is nice, fresh rosemary would be good. This makes a silky flavorful soup! I think I'll use a few Tbsp of pumpkin butter in mine. Yum!


Monday, November 1, 2010

A Boo-tiful Graveyard!

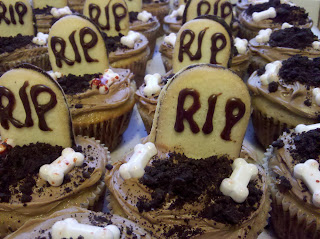
We had a 'Creepy Treats and Sides' contest at work as part of our Halloween party. It was sooo much fun! My entry won 2nd place in the 'Tasty' category. I put together a graveyard using cupcakes. It was a lot of fun to decorate. Here's what I did:

1. Bake cupcakes. I used a small can of pumpkin (about 15 oz.), 2/3 of that can of water and a spice cake mix for the first batch. Just mix them up, use some fancy Halloween cupcake wrappers, and bake them according to package directions. Very good with chocolate icing. I also baked up a batch of Butter Pecan cake mix and paired it with caramel frosting. Just bake the cupcakes-- Don't frost them yet.

2. Buy a box/bag of oreos or equivalent. Twist apart the cookies and scrape off all the frosting. Put the chocolate wafers in a large ziploc bag. Squeeze out as much air as possible, then bash the bag with a rolling pin or the bottom of a small saucepan until they are completely crushed. This will be your dirt.

3. Buy a bag or two of Milano cookies. I used the kind with dark chocolate. Using a small piping tip, pipe the letters 'RIP' on each. They should look like this:


4. Frost the cupcakes. I used chocolate frosting for the pumpkin cupcakes and caramel frosting for the butter pecan cupcakes. Once the cupcakes are frosted, press the Milano cookie tombstone halfway in and sprinkle with dirt. Place a few bone sprinkles on each (I found those cute bloody bones and Target) and viola-- a Bootiful Graveyard. Here are a few pics of the finished product:

Pumpkin Chocolate

Butter Pecan Caramel
Hope everyone had a great Halloweekend! Now we can look forward to Thanksgiving in a few short weeks. What will you be cooking?